Thinking in React
The Chinese version of this article was translated from https://beta.reactjs.org/learn/thinking-in-react. This English version follows that translation.
React can change the way you think about designing and developing apps. Before using React, you might see an entire forest; afterward, you can distinguish each tree. React makes it easier to design systems and manage UI state. In this tutorial, we will build a searchable product table with React.
Start with a Mockup
Suppose you have a JSON API and a mockup from a designer.
The API returns the following data:
[
  { category: "Fruits", price: "$1", stocked: true, name: "Apple" },
  { category: "Fruits", price: "$1", stocked: true, name: "Dragonfruit" },
  { category: "Fruits", price: "$2", stocked: false, name: "Passionfruit" },
  { category: "Vegetables", price: "$2", stocked: true, name: "Spinach" },
  { category: "Vegetables", price: "$4", stocked: false, name: "Pumpkin" },
  { category: "Vegetables", price: "$1", stocked: true, name: "Peas" }
]
Here is the mockup:
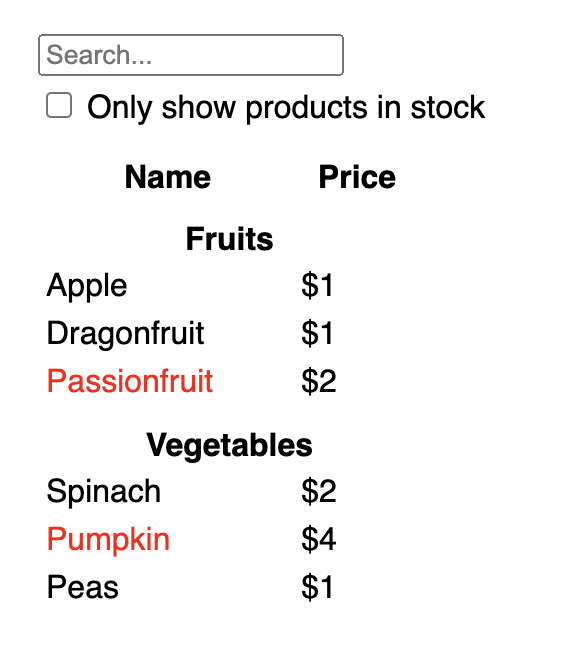
We will implement this UI in five steps.
Step 1: Break the UI into Components
First, draw boundaries around the components and subcomponents in the mockup, and give each one a name. If you work with a designer, they may already have named these parts in their design tool.
Depending on your background, there are several ways to approach this:
- Programming: Think about components the way you think about functions or objects. One useful idea is the single responsibility principle: each component should have one job. If it keeps growing, split it into smaller components.
- CSS: Think about the way you group elements with CSS selectors, although components are usually less granular.
- Design: Think about how you would organize the layers in a design.
If your JSON is well structured, you will often find that it maps naturally to the UI's component structure. The UI and the data tend to share the same information structure, or shape. Divide the UI into components, with each component representing a piece of that structure.
There are five components on this screen:
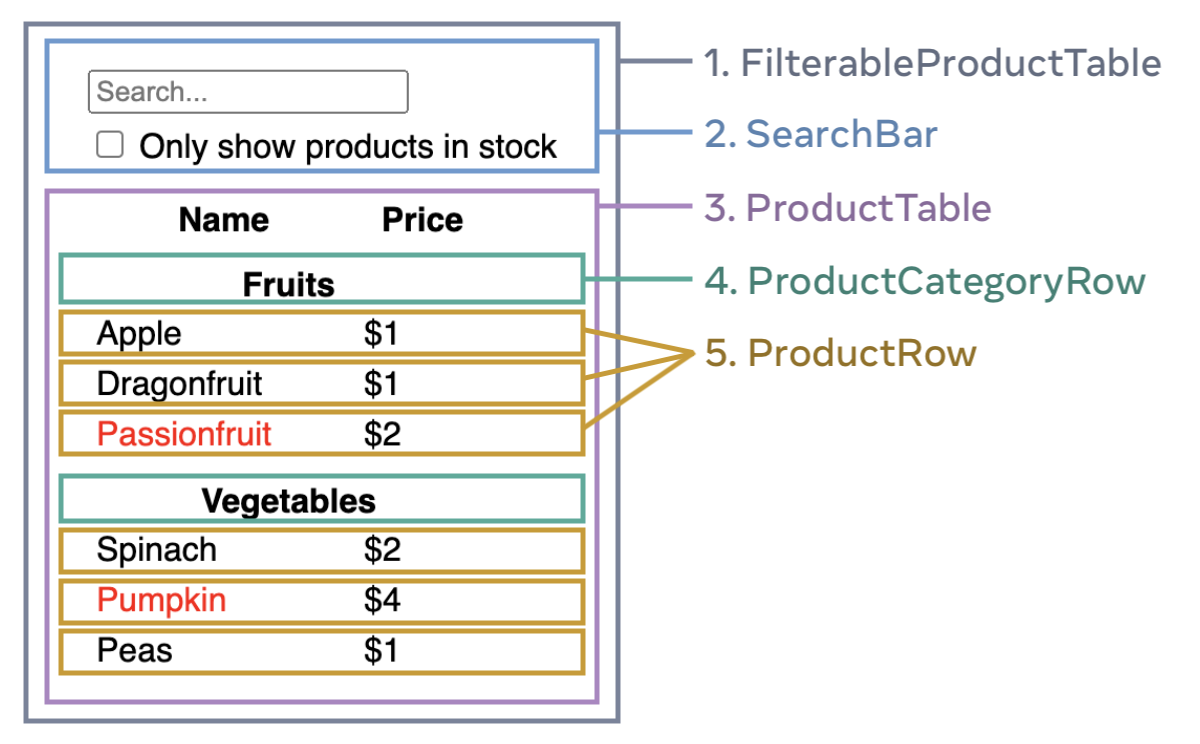
FilterableProductTable(gray) represents the entire app.SearchBar(blue) accepts user input.ProductTable(purple) displays the product list filtered by that input.ProductCategoryRow(green) displays a category heading.ProductRow(yellow) displays a product row.
Notice that the table header, including the Name and Price labels, is not a separate component. Either choice is reasonable. Here it remains part of ProductTable because it belongs to that table. If the header becomes more complicated, for example by adding sorting, a separate ProductTableHeader could make sense.
After identifying the components, arrange them in a hierarchy. A component that appears inside another component in the mockup becomes its child:
- FilterableProductTable
- SearchBar
- ProductTable
- ProductCategoryRow
- ProductRow
Step 2: Build a Static Version in React
Now that you have a component tree, build a version that renders the data model without any interaction. It is usually easier to build the static version first and add interactions later. A static version involves plenty of typing and relatively little reasoning; interactions require more reasoning and often fewer lines of code.
To render the data model, build reusable components and pass data through props. Props carry data from a parent component to its children. If you already know about state, avoid using it for the static version. State is for data that changes over time as users interact with the app.
You can work from the top down, starting with a component such as FilterableProductTable, or from the bottom up, starting with something like ProductRow. A top-down approach often works well for small apps, while bottom-up development can be easier for larger projects.
function ProductCategoryRow({ category }) {
  return (
    <tr>
      <th colSpan="2">{category}</th>
    </tr>
  );
}

function ProductRow({ product }) {
  const name = product.stocked ? product.name : <span>{product.name}</span>;

  return (
    <tr>
      <td>{name}</td>
      <td>{product.price}</td>
    </tr>
  );
}

function ProductTable({ products }) {
  const rows = [];
  let lastCategory = null;

  products.forEach((product) => {
    if (product.category !== lastCategory) {
      rows.push(<ProductCategoryRow category={product.category} key={product.category} />);
    }
    rows.push(<ProductRow product={product} key={product.name} />);
    lastCategory = product.category;
  });

  return (
    <table>
      <thead>
        <tr>
          <th>Name</th>
          <th>Price</th>
        </tr>
      </thead>
      <tbody>{rows}</tbody>
    </table>
  );
}

function SearchBar() {
  return (
    <form>
      <input type="text" placeholder="Search..." />
      <label>
        <input type="checkbox" /> Only show products in stock
      </label>
    </form>
  );
}

function FilterableProductTable({ products }) {
  return (
    <div>
      <SearchBar />
      <ProductTable products={products} />
    </div>
  );
}

const PRODUCTS = [
  { category: "Fruits", price: "$1", stocked: true, name: "Apple" },
  { category: "Fruits", price: "$1", stocked: true, name: "Dragonfruit" },
  { category: "Fruits", price: "$2", stocked: false, name: "Passionfruit" },
  { category: "Vegetables", price: "$2", stocked: true, name: "Spinach" },
  { category: "Vegetables", price: "$4", stocked: false, name: "Pumpkin" },
  { category: "Vegetables", price: "$1", stocked: true, name: "Peas" }
];

export default function App() {
  return <FilterableProductTable products={PRODUCTS} />;
}
Do not worry too much about the code yet. This tutorial focuses on the concepts. You can learn more about the code in Describing the UI.
After building these components, you have a set of components that render the data. Because this version is static, the components only return JSX. The top-level component, FilterableProductTable, receives the data model as a prop. This is one-way data flow: data travels from components higher in the tree to the components below them.
Step 3: Find the Smallest Complete Representation of State
To make the UI interactive, users need to be able to change the data it displays. That is where state comes in.
State is the smallest set of changing data the app needs to remember. The guiding principle is DRY: do not repeat yourself. Find the minimum state your app needs, then calculate everything else from it. For example, if you are building a shopping list, store the items in an array. To show the number of items, use the array's length instead of storing another state value.
Here are all the pieces of data in this app:
- The original product list.
- The text entered by the user.
- The checkbox value.
- The filtered product list.
Which of these belong in state?
- If a value never changes, it is not state.
- If a value comes from a parent through props, it is not state owned by this component.
- If a value can be calculated from existing state and data, it does not need its own state.
What remains is generally state. Consider each piece:
- The original product list comes through props, so it is not state.
- The search text is state because it changes and cannot be calculated from the other data.
- The checkbox value is state for the same reason.
- The filtered list is not state because it can be calculated from the original list, search text, and checkbox value.
Only the search text and checkbox value need to be stored in state.
A Closer Look at Props and State
React has two kinds of data with different roles:
- Props resemble function arguments. They let a parent pass information to a child and configure it. For example, a
Formcan pass a color to aButton. - State is a component's memory. It lets a component track information and change its behavior over time. For example, a
Buttonmight track whether it is hovered.
Props and state work together. A parent often keeps information in state and passes it to its children through props. It is normal for the distinction to feel unclear at first; practice makes it easier.
Step 4: Decide Where State Should Live
Once you know which values belong in state, decide which component should own and update them. Remember that React uses one-way data flow, from parent to child. The right owner may not be obvious at first. Use these steps for each piece of state:
- Find the components that render something based on that state.
- Find their nearest shared parent.
- Choose where the state should live. Usually it belongs in that shared parent, or in a component above it. If no existing component is a suitable owner, create a new parent component to hold it.
We found two state values: the search text and the checkbox value. They are used together, so it makes sense for the same component to own them.
Apply the process:
ProductTableuses the state to filter products, andSearchBardisplays the current values.- Their nearest shared parent is
FilterableProductTable. - Therefore,
FilterableProductTableshould own the state.
Use the useState hook to manage it. Add two state variables at the top of FilterableProductTable, with their initial values:
function FilterableProductTable({ products }) {
  const [filterText, setFilterText] = useState('');
  const [inStockOnly, setInStockOnly] = useState(false);
Then pass filterText and inStockOnly to both ProductTable and SearchBar:
<div>
  <SearchBar filterText={filterText} inStockOnly={inStockOnly} />
  <ProductTable products={products} filterText={filterText} inStockOnly={inStockOnly} />
</div>
You can see how this works by changing useState('') to useState('fruit'). Both the search field and the table update to reflect the initial search text.
In the example, ProductTable and SearchBar read the filterText and inStockOnly props. For example, SearchBar uses the following value for its input:
function SearchBar({ filterText, inStockOnly }) {
  return (
    <form>
      <input
        type="text"
        value={filterText}
        placeholder="Search..."/>
Read Managing State for more about how React uses state and how to organize it.
Step 5: Add Data Flow in the Other Direction
The app now renders correctly as props and state flow down the tree. To respond to user input, information also needs to travel upward: the form components need a way to update the state in FilterableProductTable.
React makes the flow explicit, so this takes a little more code than two-way binding. If you type into the input or click the checkbox now, nothing changes. That is intentional. With <input value={filterText}></input>, the input is always set to the value of filterText. Since nothing updates that state, the input's value stays the same.
We need to update state in response to user input. FilterableProductTable owns the state and has access to setFilterText and setInStockOnly. Pass these functions to SearchBar so it can request updates:
function FilterableProductTable({ products }) {
  const [filterText, setFilterText] = useState('');
  const [inStockOnly, setInStockOnly] = useState(false);

  return (
    <div>
      <SearchBar
        filterText={filterText}
        inStockOnly={inStockOnly}
        onFilterTextChange={setFilterText}
        onInStockOnlyChange={setInStockOnly} />
Inside SearchBar, add an onChange handler that calls the function supplied by the parent:
<input
  type="text"
  value={filterText}
  placeholder="Search..."
  onChange={(e) => onFilterTextChange(e.target.value)}
/>
The app now responds to input.
See Adding Interactivity to learn more about handling events and updating state.